My Online Art Portfolio

Monday, January 30, 2012

Spreading My Wings to Explore New Horizons

First, before I say anything else, I want to profusely thank all of the visitors who have stopped by and looked at the site. I hoped it brightened your day, educated you, or amused you.

Secondly, and mainly, I want to say that I haven't posted on this blog for a very long time. This is because I've been hammering away at college for the past four semesters, and I'm going to get my Associate's this May, thanks to my constant, hectic, school schedule.

Even though crafting, gardening, cooking, baking, and the other right side brained arts have and always will be close to me, I have my heart set on a particular one-music.

Because of this I am now seeking a career in writing film music and performing. I am excited to say that I've been accepted to my dream school for my Composition degree, and I can't get much happier than this.

I don't have the time to attend to my other hobbies and blogs as I once did, but I have not ceased doing the crafts.

If I were to pick up blogging again, I would choose to just keep up one blog, and I would aim to be more organized and regular on my posts. I would also put all of my right brain interests-music, art, crafts, cooking, baking, sewing, and writing, onto the same one. I would also probably choose a wordpress formatted blog to do it on, since it is what my other blog-my crafting blog-is on. But time will tell what my preferences are in the future.

So, in the future, possibly near, but I'm not certain, I may have a blog again. It would be described as the past paragraph stated. I thank you all for your visits-and I hope you look me up in the future! Thanks, and have a great day!

Saturday, September 24, 2011

Portfolio

I've finally got my online art portfolio up and running again. I'm using yolasite, which is fantastic. It looks nice and it's free.

No more sitekreator for me after my last experience!

Anyway, so here it is, and it's also under the blog header. Thanks for looking!

http://katkinart.yolasite.com/

Monday, January 31, 2011

hey, I've moved

Hey, I decided to congeal my art blog and my craft blog. So if you want to see my art, hop over to to http://knits4uandme.wordpress.com/.

Thanks! Oh, and I apologize for the broken art portfolio link-I working on getting it up and running again. So until then, you can look at my old art blogs:

http://talkingdogart.blogspot.com/

and

http://journeyforart.blogspot.com/

and my flickr site, which I am continually adding more photos to: http://www.flickr.com/photos/58626166@N04/

Anyway, thanks for stopping by!

Wednesday, June 9, 2010

monet esc

Okay! So I've started on my monet-ish picture. I'm afraid that copious quantities of nasal drip and many other unpleasant cold-like symptoms have gotten in the way of me getting very much done on it, but here is what I have so far.

Oh. Did I tell you my experiment? On Monet? No? Oh-I'll will tell you. I picked out ten on Monet's paintings that I liked, and opened each in photoshop. With the eyedropper tool, I randomly picked ten colors from each painting. Matching it with prismacolor pencils, I made a sampler for each painting. See?


Here, I have separated each of the horizontal bars and stuck them onto each painting, so you can see and compare for yourselves. The reason for this experiment was to wrap my head around his color palette.


So what have I learned from this experiment, you ask? Plenty. For one thing, Monet rarely used pure black. He tried to avoid it, because really, if you look carefully, something that looks black is almost never really black.

Also, even though he had a wide color range, particular colors appear again and again in all of his paintings, such colors are: periwinkle, baby blue, henna, cream, limepeel, pumpkin, peach, and a dull olive green.

So without further ado, here's the start on my picture.
...and that's it for today. Check back for updates. Thanks for stopping by!

Tuesday, June 1, 2010

third wolf portrait completed!

Over the long hours between the hot afternoon and the memorial day dinner to be had, I found time to finish my third wolf macro. In the end, I burnished everything-crisped up the edges of his fur, which I had accidentally blurred with my clumsy hand, and I added a lot more colors to his forehead and face in general (yes, it is a he, don't ask me what makes me think so, I haven't the foggiest).

So, anyway, here he is. This guy seemed the hardest of all three for some reason. I think getting the hang of the contrast was more difficult on this one.


*She sighs as she sits back*. Now that that's done, I was thinking of doing something with people in it-an actual scene and not so much a portrait.


I've been an avid admirer of Monet since...since always, actually.


I love his soft but realistic color palette, that often includes as much moody darks as airy pastels. The floaty blurriness of the paintings somehow seem more realistic- to echo the way fast moving life looks than a photo-crystal clear painting.


I have some photos I took of Lewis Ginter Botanical Gardens two years ago with my sister, her daughter and a friend walking about the gardens' many paths, and I got to thinking. I think I'm going to try a Monet-esc painting. Nothing madly sharp and perfect-airy and watercolory and pastelly.Will it be a toss, or a keeper? We'll see how it goes.


Saturday, May 29, 2010

update on 3rd wolf

Here's a bit of an update. My art room was eight thousand degrees-which is unfortunately where the computer and all the art supplies were-so moving it wasn't really an option. But I did get some done.

Today I wanted to talk a little about burnishing. It's when you've laid down several shades of pencil color on paper, and the tone looks good but the texture is, eeewwcch. It might be grainy. It might be a little uneven. The thing it is not is smooth. That's where burnishing comes in. After you've made your layers, you take a lighter, neutral colored pencil that is going to not or only alter a little the general color you've tried to achieve on the paper. You sharpen that pencil, and, sharpening it often to keep it to a fine point, you press very firmly and evenly (not too firmly-you don't want to rip the paper!!) until you have actually pressed down the tooth or fuzziness-the texture of the paper essentially. What this achieves is a polished, finished, smooth look. Some colored pencil artists like their work more burnished than others. Some don't burnish at all! But usually a great majority do, unless you're going more for the "Snowman by Raymond Briggs" effect, which isn't a bad thing.


Anyway, below I have some progress pictures as I work through layering and then burnishing the background.

You'll notice that I tend to add a lot of pinks and purples. Girly me.


Starting to put in the background near his left ear.


More of the background layering.


I'm getting kinda crazy with the pastels, but bear with me-blues and purples tend to make whatever they're coloring go back visually. Think about when you see blue mountains in the distance.


Ahh, now the burnishing. Do you see it?
The little bit that I've started, using a
light gray pencil?


What? You don't see it? Here, I'll put a red circle around it.

This does take time, but if you want the effect, it is worth it. I burnish all of my pieces. Keep in mind that once you burnish an area, it is very, I repeat, very, tricky to get any more pencil on top, and I don't reccommend that you try. You're going to end up with a smooth patch with what looks like a three year old scribbled on top unless you're very careful. It also really depends on how much tooth the paper you're using has, too.


Now I've burnished that whole background bit. Doesn't it look better?


I also darkened up the wolf's features a bit, he was not quite sharp enough for my taste.


And here's where I am so far. Now, all I really need to do to finish this up is to do the upper right corner and his furry shoulder on the lower left corner and then I can call it done.

Hope this helped you other colored pencil artist newbies out there! Have a happy memorial day weekend!

Wednesday, May 26, 2010

first post


Hi! You may or not have read my About Me profile at the side of the blog-but regardless, you should know that this blog is going to be about my art projects, namely, ones made from acrylic paints on canvas and colored pencil drawings on paper.

It's also going to be about the progress and steps that I make as I go from initial idea to rough sketch and from the vague start of a work to the completion, or in some rare cases, a complete toss out, if the idea was never meant to work!

It's about me stretching my horizons as a curious and ambitious artist-about my methods and how I work them-the supplies I use, the artists I admire, what can be learned from them...

...essentially...this blog is about...wait for it...ART. Really and truly.
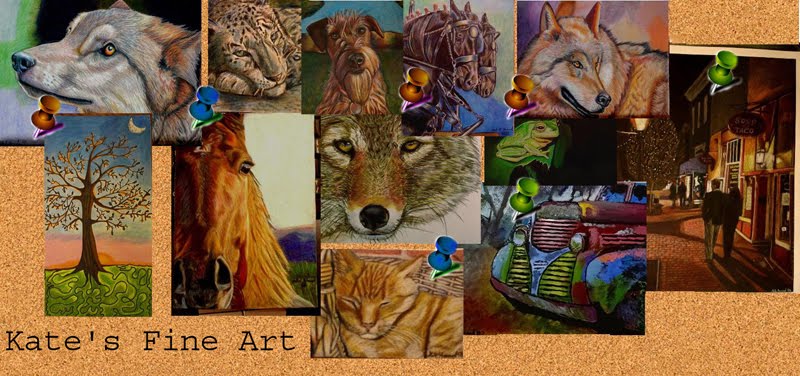
My portfolio is at this website if you want to have a closer look at my past and present works.

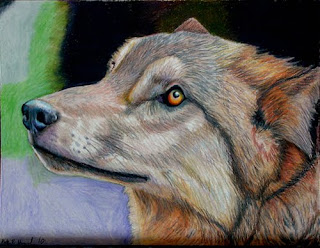
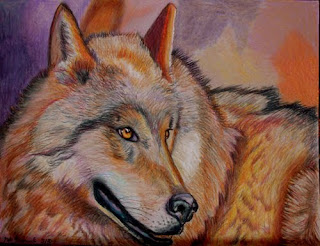
So onward from that-I've been working on wolf macros-you'll probably have seen that I stated in my profile that animal macros are among one of my favorite kinds art projects.

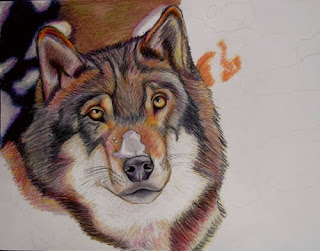
These are no exception. I've made two, as you can see-and I am working on a third.


As for all of my colored pencil projects, I've use/been using Prismacolor pencils, just the original kind, not extra smooth or anything different. I've also been using a graphite pencil, for marking out where the facial features are supposed to be, and the smooth side of water colored paper.

For those out there who don't know-water color paper is generally used for water color painting. But it so happens that it works for colored pencil-and I happen to like it quite well-but I do use the smooth side, as opposed to it's coarse side. Some people like it, but me, arrrrrerrr, too grainy of a finish for my tastes.

And, of course, I always have a photo (or several!!) photo references to follow. How closely one follows it is entirely up to the artist. I generally try to make a close likeness, but go a little wild on the colors, and make the drawing more contrasted than the photo really is, so that the subject really pops at you.

I get my photo references from wetcanvas, where you can search their photo reference data base and use any of the photos without having to pay royalties or credit to the photographer, and you may sell the finished art piece.

I use Flickr sometimes, but it's more tricky-even with the creative commons liscensed photos, because even then, you may still have to credit the photographer, which is difficult if you plan to sell your finished piece. Better to go ahead and pick out the photo you like, and send the photographer an email or flickrmail asking permission.

Or, if you're handy with the camera, just get out there and take some photos of subjects you're interested in! Usually, as you might have guessed, I do all three. Just make sure whatever you do, you have the permission-whether it be permission to take a picture of someone's dog, a photo from flickr, or any other source you're unsure about.

I think that's enough for today's post. Check back for my progress on my third wolf portrait, and thanks for stopping by!